Essential SCIENCE
Learning Benchmarks
Learning Benchmarks
1.1 Students will use properties to identify, describe, and categorize substances, materials, and objects, and use characteristics to categorize living things.
Grade Levels
4th-8th grades
Subjects
Earth Science,
Geologic Time,
Fossils
Concept
What geologic conditions lead to
the formation of fossils.
Skills
Observing, analyzing, classifying,
and identifying relationships and
patterns.
Objective
Students will simulate the making
of fossils.
Time Needed
90 minutes
Discussion
1. Why was it important to have the
sand layer (sand stratum) between
the layers of clay?
2. What are some processes that
create fossils?
3. What sorts of fossils have you
seen in a museum or collected
yourself?
4. Think about how long it took
you to make your fossils. How
does that relate to GEOLOGIC TIME.
All our science,
measured against
reality, is primitive
and childlike–and yet
it is the most precious
thing we have.
–Albert Einstein (1879-1955)
Permission is granted to photocopy this lesson. There is no copyright.
Simple Home Experiments for Bringing Geology to Life
Experiment 2: CONDENSING GEOLOGIC TIME or The Art and Science of Making Fossils
Background:Finding plants, animals, and even early humans buried in the geologic strata gives us clues to what our planet Earth was like in the past.
 Equipment needed:
- Small oven-proof dish or pan
- Clay, local, natural source if youre lucky, otherwise play-dough or modeling clay will work (No oil-base clays! They will burn in the oven.)
- Leaves, empty shells, dead bugs, etc.
- Sand
Purpose:
This experiment will teach you about the process of fossil burial, preservation,
and discovery. It will give you the opportunity to think about the types of things (or
specimens) one finds buried in sediment, about the sediments and processes that preserve
these specimens as fossils, and about TIME.
Procedure:
- Layer the bottom of your dish with about one-half inch of the clay.
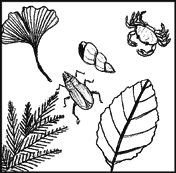
- Explore your backyard or a nearby beach and find things that might become fossilized if they were to be buried for a few million years, making sure that whatever you pick up is no longer alive!
- Next, press your finds gently into the clay.
- Then, cover this layer of fossils-to-be with a thin layer of sand. This is so your clay layers will part easily after you bake your fossils.
- Carefully add another layer (or geologic stratum) of clay to your sample. You are now ready to dry your sediments with the buried fossils.
- MAKE SURE YOU WORK WITH AN ADULT FOR THIS NEXT STEP. Put the dish in an oven on very low heat. You want to dry your sample slowly so it doesnt crack. This might take an hour or more depending on how wet the clay was.
- When the sample looks dry, VERY GENTLY remove it from the dish and pry it apart at the sand layer.`
Observations:
You should be able to see:
- Your fossil specimens,
- The impressions made in the upper and lower clay surfaces, and
- How the sample broke along the sand layer.
Expanded Activity:
Find a book about fossils at your library and look up the difference
between casts and molds and see if you can identify each in your sample.
Credits:
Wendy Gerstel and Kitty Reed, Geologists
Washington Division of Geology and Earth Resources
ScienceViews Copyright © 2003-2008 Calvin & Rosanna Hamilton. All rights reserved.